
Cropping an Image
From the Image Events scripting dictionary:
crop v : Crop an image
crop (object specifier) : the object that is the target of the command
to dimensions (list) : the width and height of the new image,
respectively, in pixels, as a pair of integers
Cropping an image removes pixels around the outside of an image. The crop command automatically centers the cropped area in the image.
The to dimensions parameter of the crop command takes as its value a list of two integers: the new width (in pixels) for the image and the new height for the image as shown in the following script:
Cropping an Image to a Specified Size
![]() A script for cropping an image to specified dimensions.
A script for cropping an image to specified dimensions.
set this_file to choose file without invisibles
set the crop_W to 640
set the crop_H to 480
try
tell application "Image Events"
-- start the Image Events application
launch
-- open the image file
set this_image to open this_file
-- perform action
crop this_image to dimensions {crop_W, crop_H}
-- save the changes
save this_image with icon
-- purge the open image data
close this_image
end tell
on error error_message
display dialog error_message buttons {"Cancel"} default button 1
end try
Most often, the crop command is used to trim the outside edges of images. This technique can be accomplished by specifying the number of pixels to crop or the percentage of pixels to crop.
Cropping an Image by a Specified Number of Pixels
The following script crops an indicated number of pixels from the height and width of an image, as shown in the figure below:
![]() A script that crops specified amounts from the width and height of an image.
A script that crops specified amounts from the width and height of an image.
set this_file to choose file without invisibles
set the vertical_crop to 24
set the horizontal_crop to 48
try
tell application "Image Events"
-- start the Image Events application
launch
-- open the image file
set this_image to open this_file
-- get dimensions of the image
copy dimensions of this_image to {W, H}
-- perform action
crop this_image to dimensions {W - horizontal_crop, H - vertical_crop}
-- save the changes
save this_image with icon
-- purge the open image data
close this_image
end tell
on error error_message
display dialog error_message buttons {"Cancel"} default button 1
end try
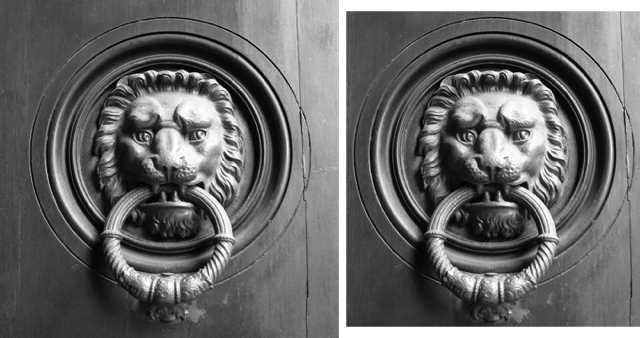
An image cropped a specified number of pixels from its height and width. Note that a crop measurement is the total applied to both sides of an image. For example, a vertical crop of 10 pixels would remove 5 pixels from boththe top and bottom of an image.
Cropping an Image by Specified Percentage
In addition to cropping by indicating a specific number of pixels, you can crop by a percentage of the image width and height, as demonstrated in the following script and figure:
![]() A script that uses percentages to determine the amount of pixels to crop. In this case, the image width is cropped by %32.
A script that uses percentages to determine the amount of pixels to crop. In this case, the image width is cropped by %32.
set this_file to choose file without invisibles
set the vertical_crop to 0
set the horizontal_crop to 0.32 -- 32%
try
tell application "Image Events"
-- start the Image Events application
launch
-- open the image file
set this_image to open this_file
-- get dimensions of the image
copy dimensions of this_image to {W, H}
-- perform action
crop this_image to dimensions {W - (W * horizontal_crop), H - (H * vertical_crop)}
-- save the changes
save this_image with icon
-- purge the open image data
close this_image
end tell
on error error_message
display dialog error_message buttons {"Cancel"} default button 1
end try
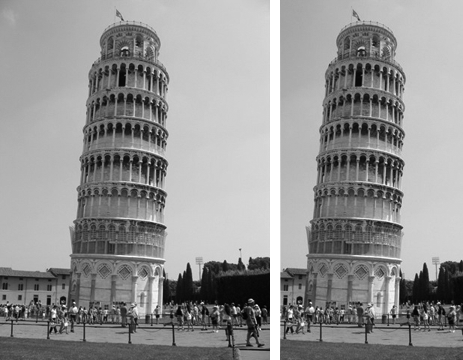
An image whose width has been cropped by %32.
Cropping an Image to Letterbox Proportions (16:9)
Another interesting use of the crop command is to convert images to letterbox format, that is with dimensions in 16 x 9 proportion. You can crop the middle section from some horizontal and vertical images to display in HD format. This technique only works for images whose main content is centered in the image.
Here’s the script for extracting an image section in letterbox format:
![]() A script that crops an image so that a section of the middle of the image, in 16 x 9 proportions, remains.
A script that crops an image so that a section of the middle of the image, in 16 x 9 proportions, remains.
set this_file to choose file without invisibles
try
tell application "Image Events"
-- start the Image Events application
launch
-- open the image file
set this_image to open this_file
-- get dimensions of the image
copy dimensions of this_image to {W, H}
-- determine the letterbox area
set crop_W to W
-- calcluate the 16:9 proportions
set crop_H to (W * 9) / 16
-- perform action
crop this_image to dimensions {crop_W, crop_H}
-- save the changes
save this_image with icon
-- purge the open image data
close this_image
end tell
on error error_message
display dialog error_message buttons {"Cancel"} default button 1
end try
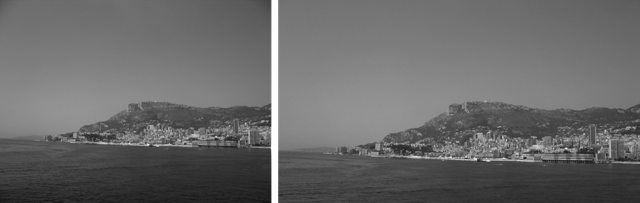
Using the crop command to extract a section, in letterbox proportions, from a horizontal image.
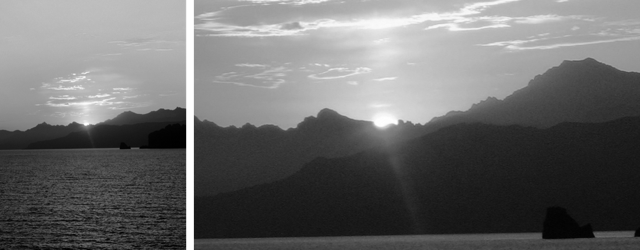
Using the crop command to extract a section, in letterbox proportions, from a vertical image.